Balasana ~ Child’s Pose for Relaxation

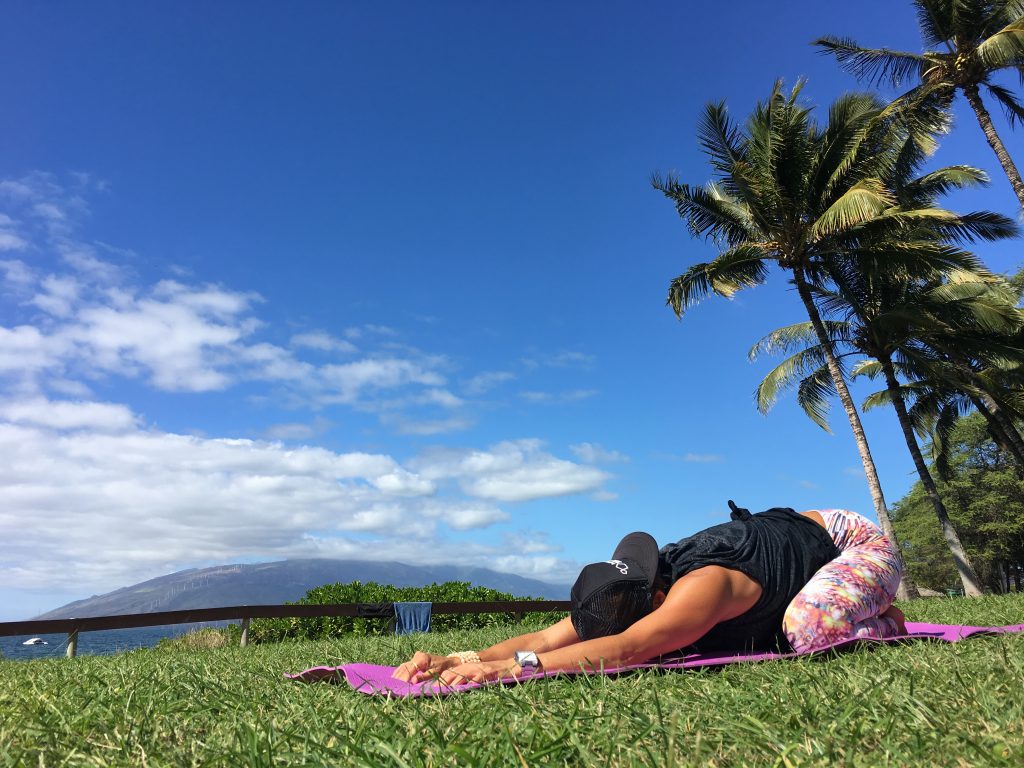
Balasana is a posture in Yoga with many benefits. The most profound benefit of the posture is the physiological calming down of the central nervous system. This is beneficial for calming down, refocusing, and relaxing. Anatomically, this asana gently and passively stretches the back of the body, thighs, and hips while it softens the front body. Physiologically, it also aids in digestion while deep breathing is maintained in the posture or asana.

To perform Balasana simply come to all fours with your knees under your hips and your hands under your shoulders. Next, engage your big toes together setting yourself up to sit back into your heels with your ankles and knees aligned safely. With your toes touching gently sit back into your heels while softening the arms and outstretching them in front of you. Keeping the toes together provides safety for the knee and ankle joints. As long as the toes are touching you can widen your knees as much as you would like although, it is beneficial to keep part or your rib cage resting on your inner legs as this provides maximum stability. Gently rest the center of your forehead into the earth. If the center of your forehead does not naturally meet the earth then simply make a bridge for your head with your hands and rest your head in your hands. You can make fists and stack them one on top of the other to create a taller bridge if you need.

While you are released in the asana begin to breath deeply into your nose focusing the breath all the way down into your lower abdomen on the inhale and fully out on the exhale either through the nose or mouth. Deep breathing will maximize the physiological benefits of the asana. Breath in… breathe out… inhale…exhale.

Balasana ~ Child’s Pose for Calming the central nervous system, creating a feeling of calm and relaxation and for passively stretching the body.

Meditate

This is a very busy time of year for most people.  As you find yourself bouncing from place to place, event to event, party to party, work, and travel make sure you take some time to bring it back to the center.  Meditation is a fabulous way to do this.  Some people become overwhelmed when they think about Meditating.  Typically, the first response is ‘I don’t have enough time’.  The beauty about Mediation is that you really only need 5-10 minutes and even if you only have 2 minutes to spare, you will still help yourself.  The longer the practice the more profound the practice becomes but any little bit helps.  I find that Meditating in the morning is the best time for me.  This is the time before I get involved in my day and it sets my day up nicely.  I am able to think more clearly and deliberately when I Meditate in the morning.

Simple Meditation Techniques

Meditation does not have to be highly involved.  You can simply take a few moments, sit comfortably, and focus on your breathing.  A typical Mediation stance is one that allows the spine to be erect without leaning against something.  You can sit on a blanket or a towel and ensure that the sitting bones are rooting down firmly and evenly.  Next, you extend from the crown of the head and try to create space between the vertebrae.  I visualize my vertebrae as a strand of pearls, one pearl extended gently above the other, or one vertebra extended gently above the next.  You then either close your eyes fully or gently release your gaze toward the ground or a flickering candle.  If you are in a loud environment I recommend closing your eyes and visualizing your happy place.  For me this is under water.  With your sitting bones grounding, your spine elongating, the heart and head lifting, and your gaze set or eyes closed, you then simply breath.  Focus on the breath.  Take an inhale for three counts, a gentle pause, and an exhale for four counts.  Making your exhales slightly longer than your inhales will allow the residual oxygen to be pushed from your lungs. Do this for as long as you have and enjoy the calm, clear effects of Meditation.

Core Strength

Core strength is one of the most important things that we can focus on.  With a strong core we protect the abdominal organs, support the back, improve breathing, and prevent injuries.  Core strength protects the abdominal organs because as the muscles are strengthened they become harder forming a shield around the abdominal organs.  Core strength supports the back because when the core is strengthened, the body does not have to rely solely on the back to hold the trunk upright and elongated.  The core takes the burden off of the back.  Breathing is improved with a stronger core as well because our diaphragm, or breathing muscle, sits atop the abdominal organs.  When we build the accessory voluntary muscles of the core the involuntary muscle of the diaphragm can move more easily and deeply.  Deep diaphragmatic breathing is essential to calming the central nervous system and bringing fresh blood and oxygen to the tissues of the body.  Injuries are prevented with a strong core in much the same fashion as the abdominal organs are protected.  A strong core enables you to move from a central place avoiding injuries of the extremities.

Vasisthasana ~ Side Plank Pose ~ Anatomical Alignment

There are many Yoga postures that can improve core strength.  Vasisthasana, or Side Plank is one of the best ways to work the entire core including front, back and side body.  There are two basic variations that you can practice.  The first variation, or simplest, is done by bringing the right hand directly under the shoulder and the right knee directly under the hip, extending the left leg and energizing through the left heel.  The right toes will point in the same direction that the left heel is energizing to.  Energize through the right arm and left leg while gently energizing through the top of the right foot.  Extend the left arm over the left shoulder and focus on breathing fully and deeply through the entire torso.  The second variation is pictured and is done with the right arm under the right shoulder and both legs extended from the hips, flexed at the heels with the entire body facing front.  Energize the grounded hand as you reach through the left hand, and energize through both legs from the heels while lifting the quadriceps in and up.  Breath into the pose and recognize what is taking place within the body.  The nice thing about practicing Vasisthasana, or Side Plank Pose, is that you don’t even realize you are building the core as you would in traditional sit-ups.  Happy Side Planking!!

Twist and Detox

We are quickly approaching the Holiday season!  And typically with the Holiday season comes more social scenes, parties and lounging time.  We may find ourselves eating foods that are rich, sugary and outside of our typical diet. We may also find ourselves sitting and relaxing a lot with family and friends.  When the body becomes stagnant things like digestion, circulation and stiffness set in.  We can enhance our detoxing, digestion, circulation and muscle elasticity with a little bit of Yoga twists this Holiday season!  A Yoga twist is very beneficial for the entire being.  First, a Yoga twist targets digestion.  When we twist we compress the digestive organs and limit the flow of circulation.  The juiciness of the Yoga twist comes when we release the twist.  A full, fresh supply floods the digestive organs bringing with it more nutrients and more oxygen while the old supply is squeezed out.  Twisting is also extremely beneficial for the suppleness of the spine.  We keep the muscles and surrounding connective tissue open and stretched when we twist.  Anatomically, Yoga twisting is also very good for opening the chest which eases anxiety and depression enabling us to step into the world with more ease and confidence.

Why We Always Twist to the Right First

Always start a twist by compressing the right side of the body first.  Anatomically our colon, or digestive system, ascends on the right, transverses across the top, and descends on the left.  Therefore, we always want to twist right first and then left as to go with the flow of digestion.

Matsyendrasana ~ Seated Spinal Twist ~ Anatomical Alignment 

In the photograph is the Yoga posture, Matsyendrasana, or Seated Spinal Twist.  Begin by sitting on both Sitting Bones evenly.  Extend your left leg long from the hip, flex from the heel of the left foot and engage mindfully through the left quadricep.  Pull the right knee into your chest.  In variation one, you will leave the right foot to the inside of the left thigh with the right toes pointing toward the front of your space or the same direction that your left leg is extended to.  To work a little bit more challengingly, pull your right leg in toward your chest and lift it over the left leg placing it on the outside of the left thigh or calf (never at the knee joint) with the toes facing forward.  Then, lift up and out of the waist and twist toward the bent leg ensuring that you are twisting from the bottom of the spine to the top.  Place your right hand behind your hips and gently push down to lift up.  You can place your left upper arm on the outside of the right upper thigh with the fingers pointing toward the sky. Keep the Collarbones nice and open and continue lengthening from the Sitting Bones to the top of the head.  Breath gently and deeply while acknowledging how the twist feels in your body.  Gently release from the top of the spine to the bottom of the spine and twist in the opposite direction creating a de-rotation before coming into the opposite side. When you are finished both sides pull the knees into the chest and give yourself a gentle hug.  Happy Twisting!